
A Swift Developer’s Guide to Prompt Engineering with Apple’s FoundationModels
Learn how to craft effective, guided prompts for Apple’s Foundation Model using Swift, SwiftUI, and the powerful FoundationModels framework.

Each Large Language Model (LLM) has its own prompting style, but Apple’s new Foundation Model is a bit unique because it is specifically trained to work with Swift and SwiftUI.
To learn more about the Foundation Model and how it is prompted, I watched the following WWDC25 session:
Explore prompt design & safety for on-device foundation models
Code-along: Bring on-device AI to your app using the Foundation Models framework
In this blog post, I’ll summarize the prompting techniques for easier future reference.
Prompt Testing
As with all LLMs, it is important to test different variations of the prompt to figure out which one gets the best results for your app’s use-case.
One big issue with the FoundationModels is it’s extremely limited context size. Only 4096 tokens for BOTH input and output tokens. This means that your prompt counts against the context window. So you have to strike the right balance between providing a powerful prompt but keeping it short.
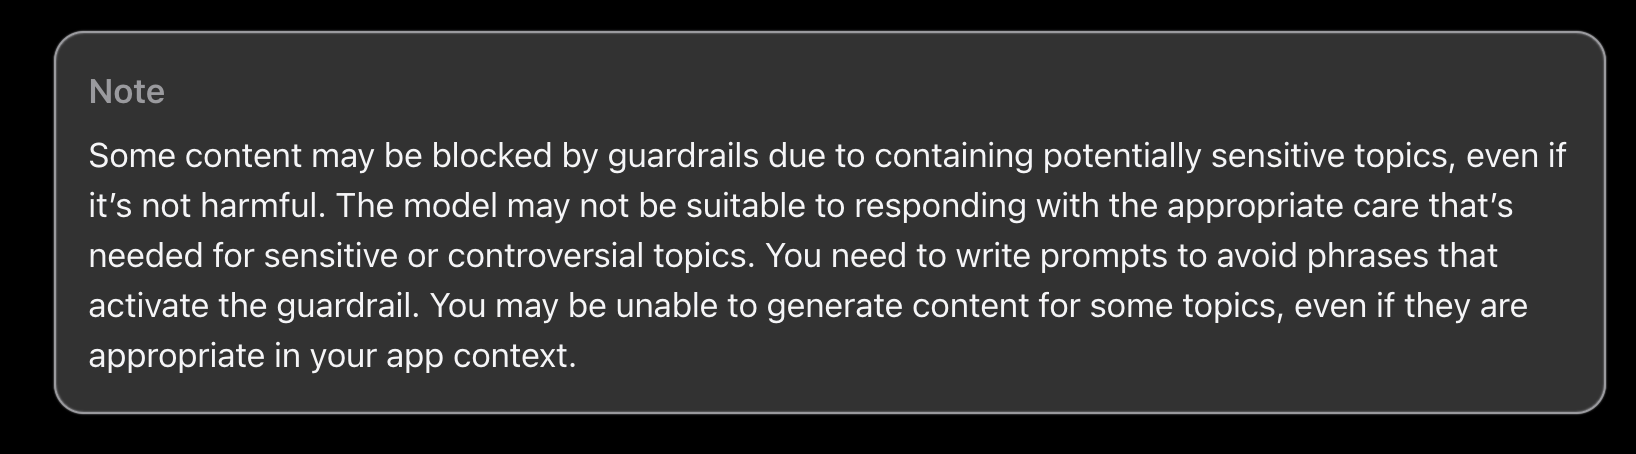
The other big issue is that the FoundationModels are extremely guardrailed against unsafe input and output. While this is a great thing in theory, in practice this can produce a lot of false positives. In other words, your innocent prompt may accidentally trigger the guardrails. Something that Apple includes in their documentation as well:
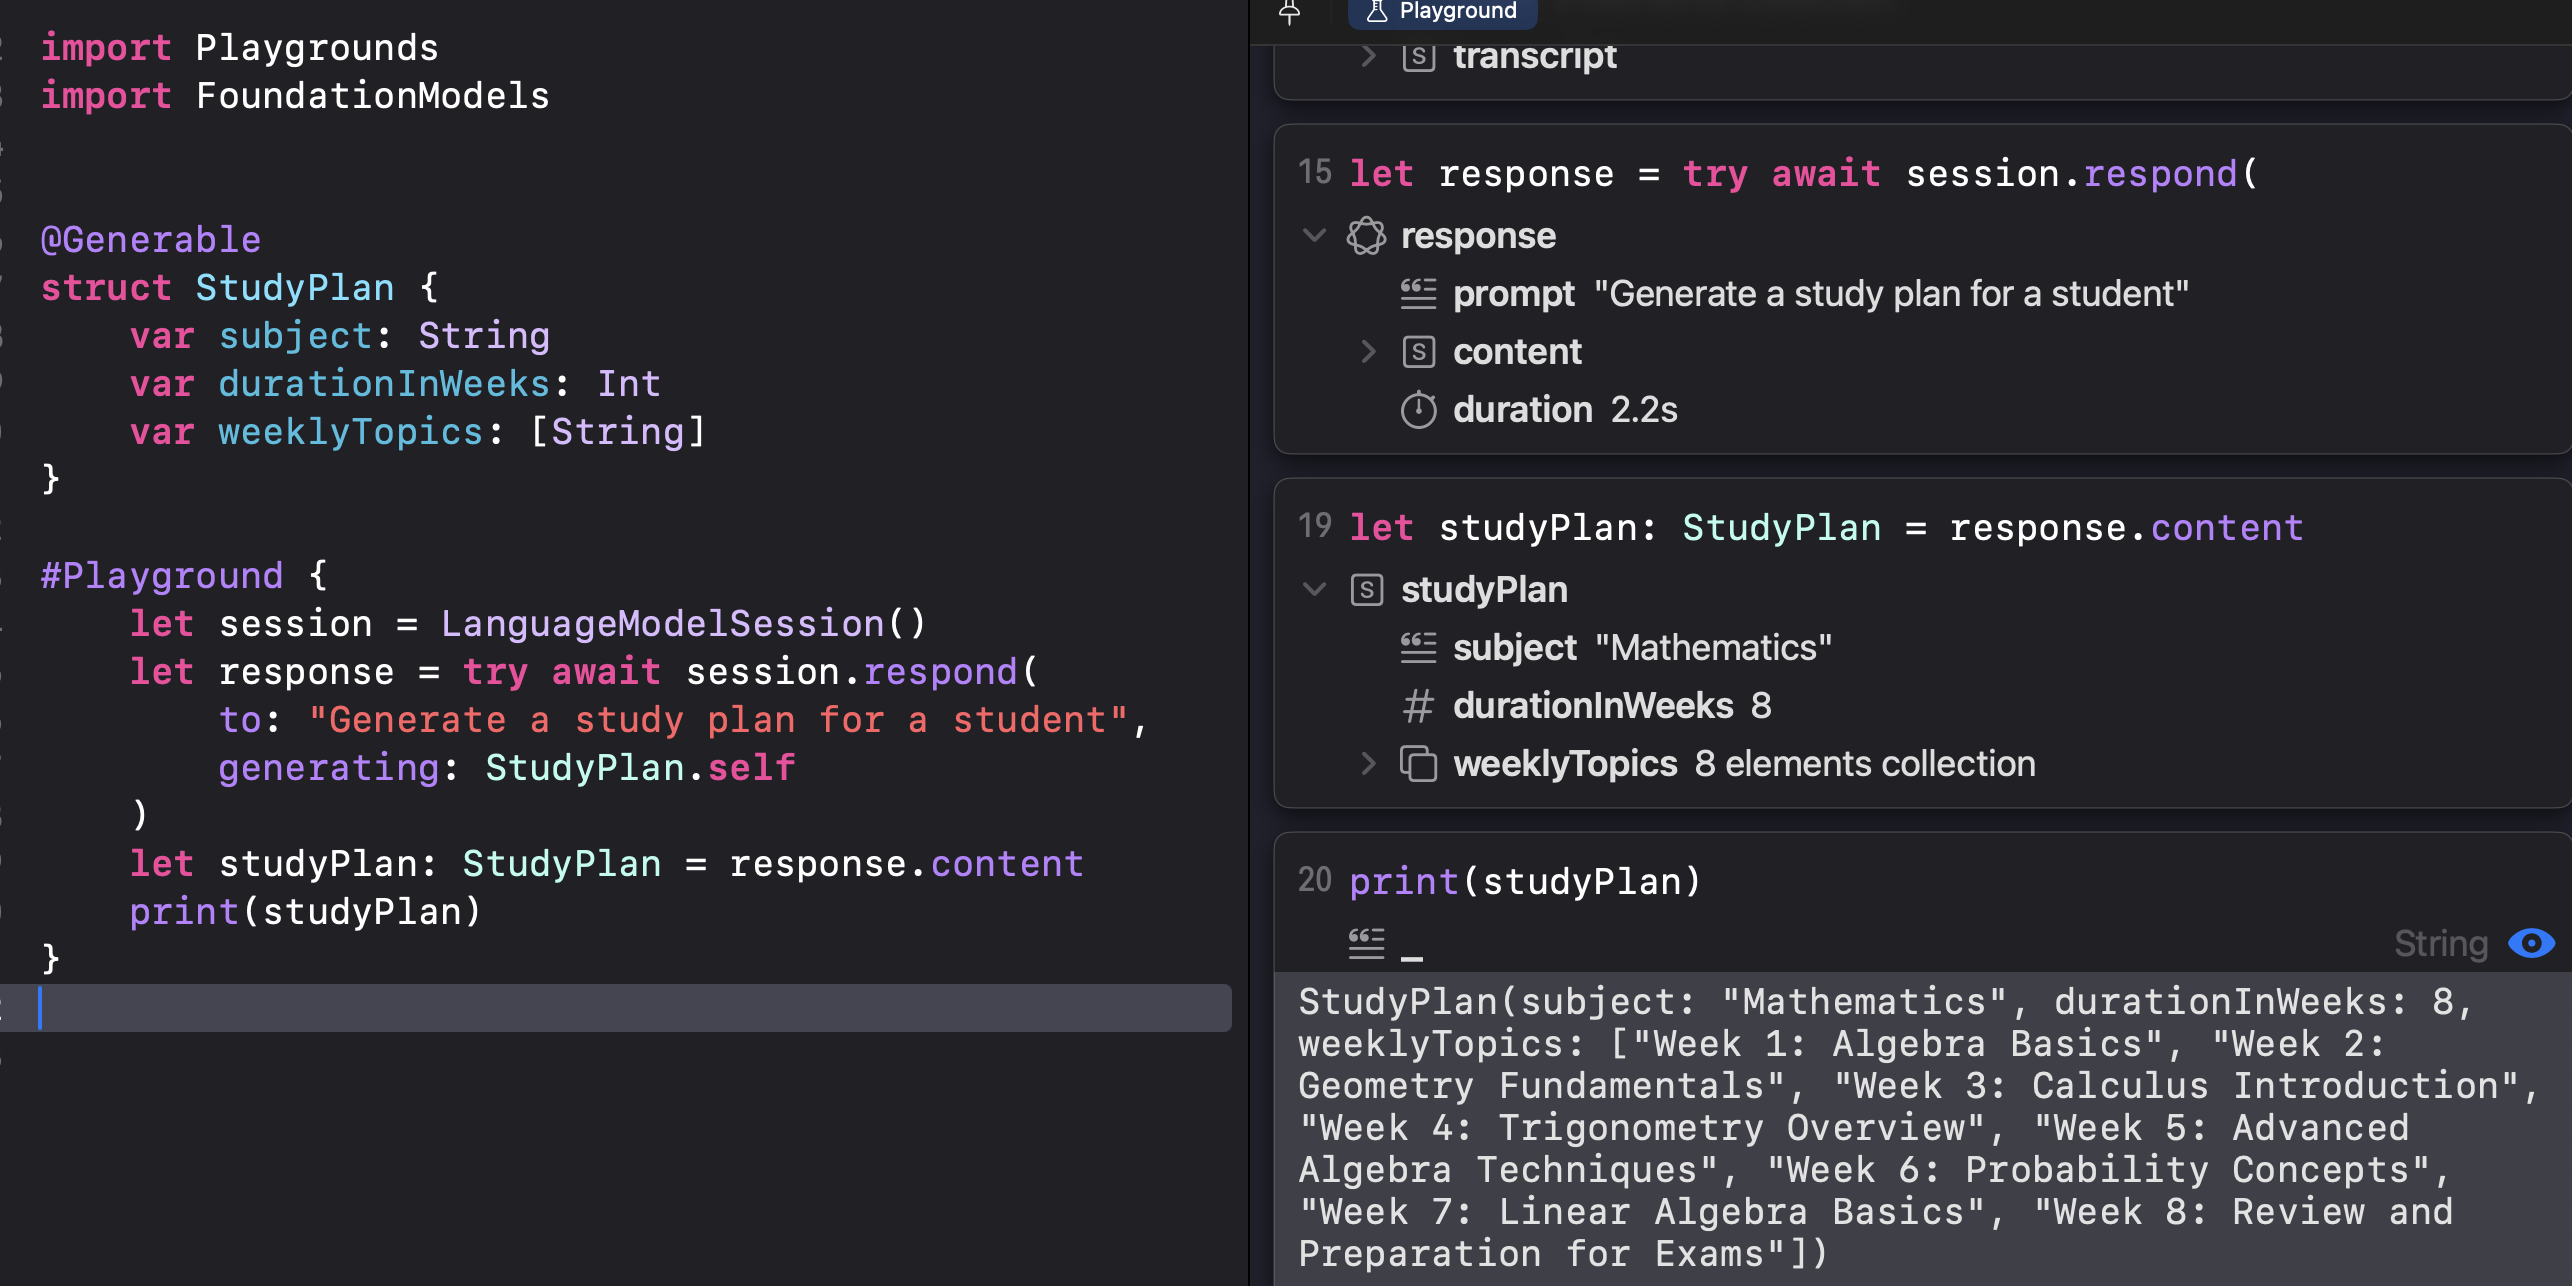
Fortunately, it is super easy to test prompts right in any Xcode project using the new Playgrounds framework!
In your project, simply create a Playgrounds.swift file, import Playgrounds and start playing around. The reason I say to do this in your project is because it’ll have access to all your types.
Here is how simple it is to get started with testing your prompts with Playgrounds:

Guides
Before you even write a prompt, the FoundationModels framework provides a powerful Generable macro that defines the structure of the model’s output for you. For example, let’s imagine we’re building an education app where study plans are generated on demand based on student requirements.
The StudyPlan object that the Foundation Model should generate would take this structure:

To generate, simply include the StudyPlan object as what the model is generating in the response:
As a starting point, this is pretty vague. But instead of starting by optimizing the prompt, we can use a Guide for each variable that we need generated to be a lot more specific with what we want.
To start with, we can add a description for each variable explaining what it is for:

Now your prompt is much more targeted for each variable, and you don’t have to include these details separately in the main prompt.
String Guides
But wait, there are more Guides! For example, let’s say our app focuses on only 5 subjects: Math, English, History, Science, and Philosophy. You can add it in as an .anyOf Guide for the subject variable:

Now you ensure that the generated response will be one of these five, which your app specifically supports.
Instead of using this guide, Generable type also supports enums, so this also works well:

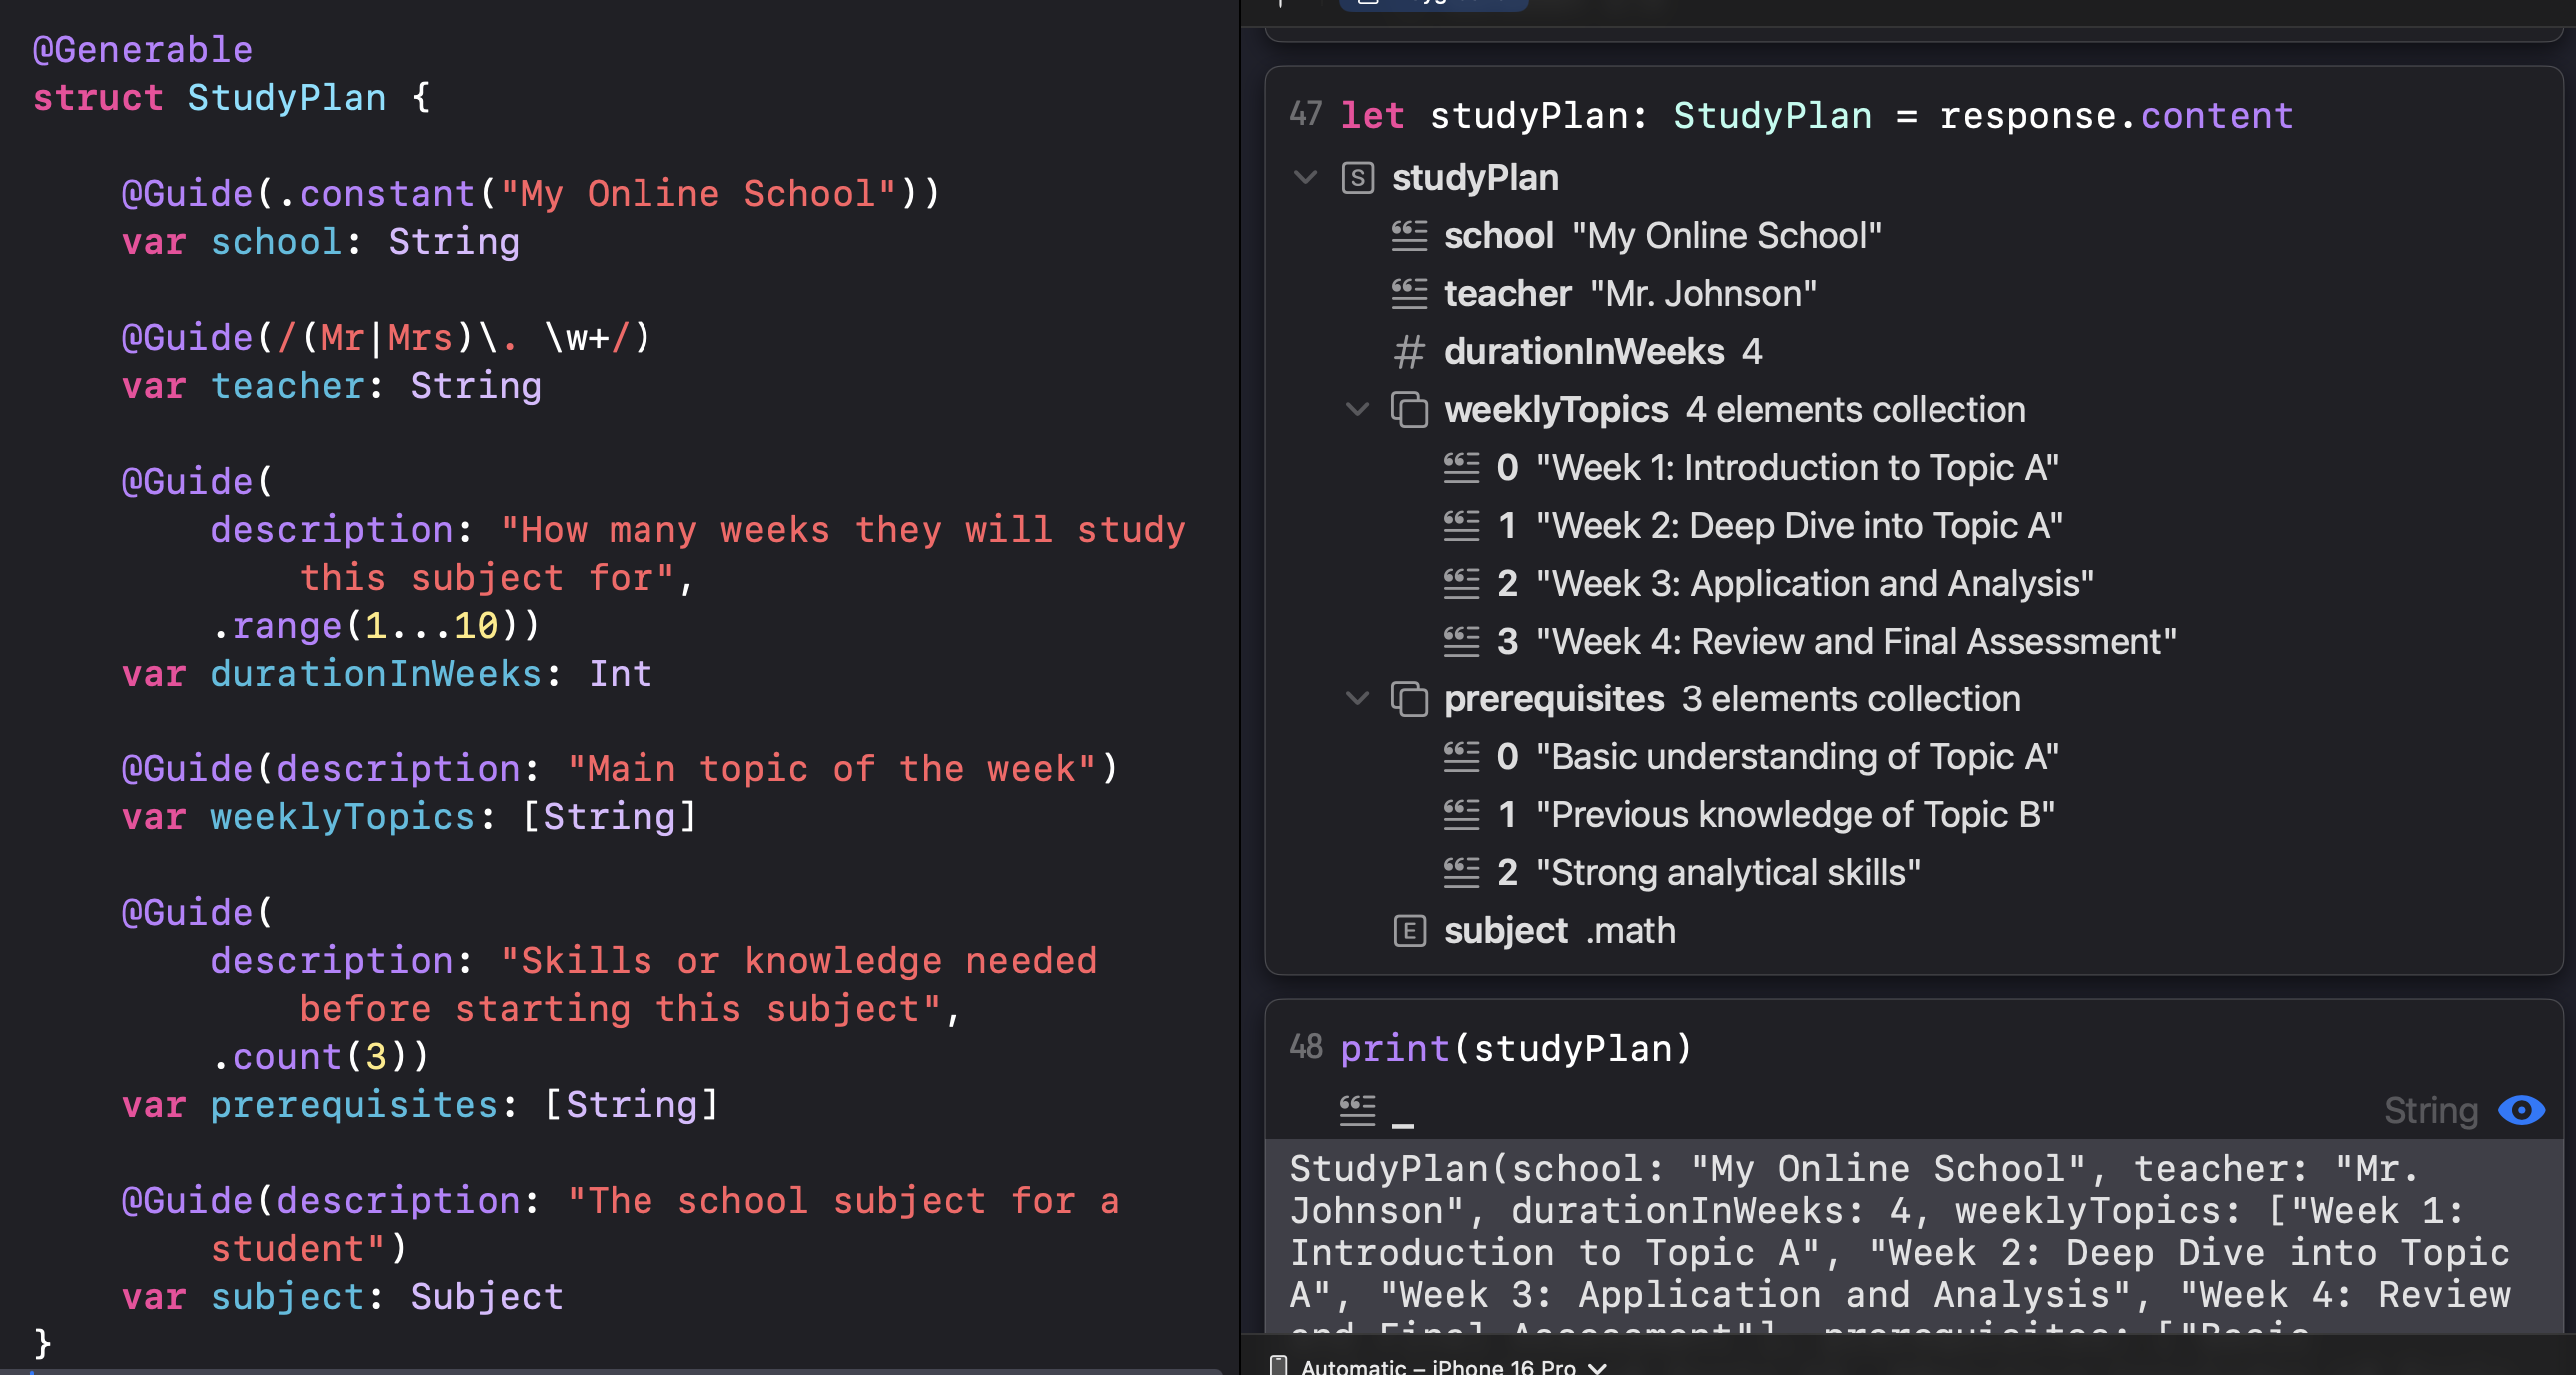
If you are using a String as a variable, it also supports .constant (always the same value - let’s say the school name in our case):

This will always generate “My Online School” for the school variable.
You can also put in a regex into the Guide! For example, this ensures that the teachers generated name always starts with “Mr.” or “Mrs.”!

And if you’re into Swift’s native RegexBuilder framework, that is also supported!

Number Guides
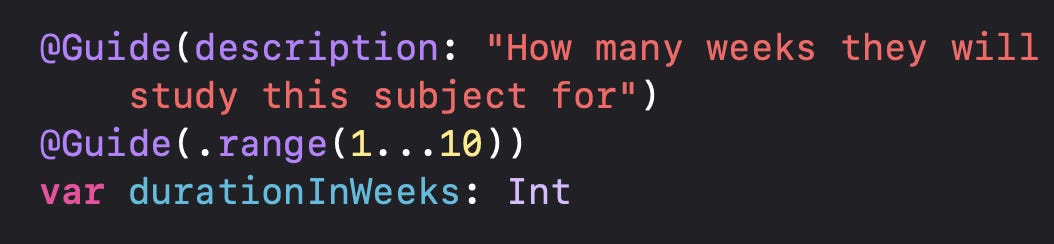
Let’s say our app only supports study plans that are under 10 weeks. It is easy to set this in the Guide using the .minimum, .maximum, or .range variables - supported for Int / Float / Double / Decimal types:
Array Guides
Finally - you can be very specific with how many objects you want generated in an array. Say, for example, that I want to include 3 prerequisites for each study plan. It’s as simple as specifying the count to be 3:

The final generated guided output will look like this:

Guided generation with the FoundationModels framework is extremely impressive because the model has been trained specifically for it. You don’t have to worry that it will go “off-script” and hallucinate enum types that don’t exist. And with only a few tokens of context window, you can use this powerful prompting technique.
Order of Properties
When you consider the Generable object as a prompt in itself, ordering becomes super important. For example, in the above example of the StudyPlan object, notice that we first generate the subject, then the weeklyTopics. The weekly topics directly relate to the subject.
Now what if the subject is put after the weeklyTopics?
Notice that the Foundation Model no longer knows the subject and is generating the weeklyTopics and the prerequisites with “Topic A” and “Topic B” as the subject! That is because LLMs generate one token (*subword*) at a time, so if it hasn’t generated the subject yet, it will not “know” what it is!
So make sure you test out different order of properties as an additional form of prompting! For example - if you first generate a short story and need a summary of that story, generate the story first then the summary to improve the summary based on the story. This is also something I do as I write my blog posts - I write the blog post first then the title after :)
Use Natural Language Length Qualifiers for Longer Text
Now let’s say I want a lot more details of what is included in the weekly topic study plan as I find it to not be detailed enough for my app:

I will go ahead and create a WeeklyTopic object to get both the title and a more detailed description:

When I generate this as part of my StudyPlan, I’m not too happy with the result - it is still too vague and general:

This is where I can include a length qualifier to my Guided prompt for the description variable to that this field needs to be “in detail”:
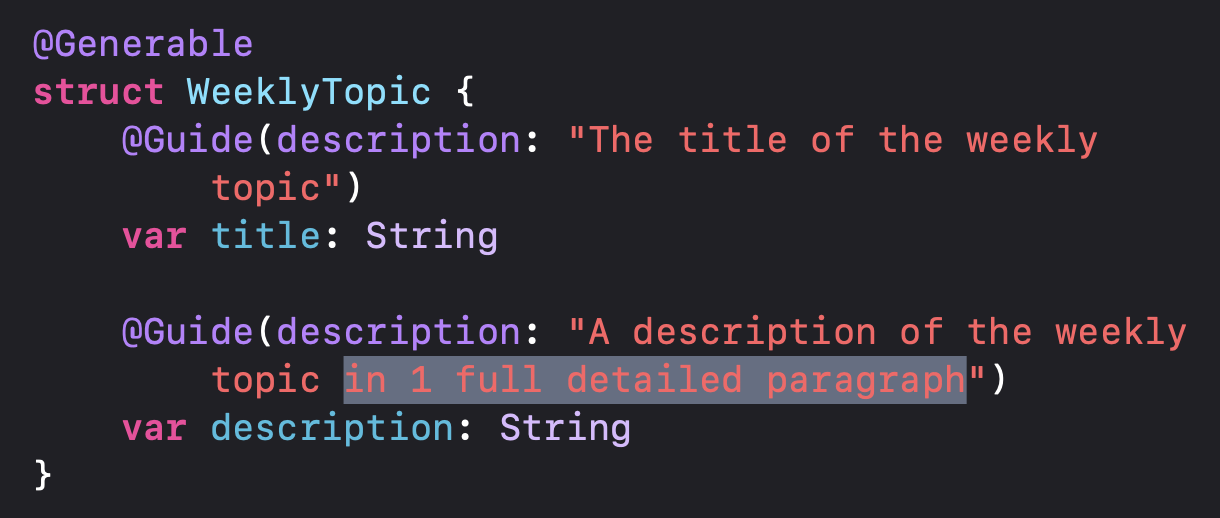
Play around with super specific lengths to get just the righ ouput for both longer and shorter styles. You can use “In a few words”, “In a single paragraph”, “In three sentences” etc. to describe the length of output you want. This is also a great way to control the prompt context window.
Character Role
Models work very well when being given a character description. Let’s say we want to be a super fun online school for kindergarten students. You can create a fun kindergarten teacher character for your study plan in the instructions:

Now this looks like a much more fun study plan for math I wish someone created for me…
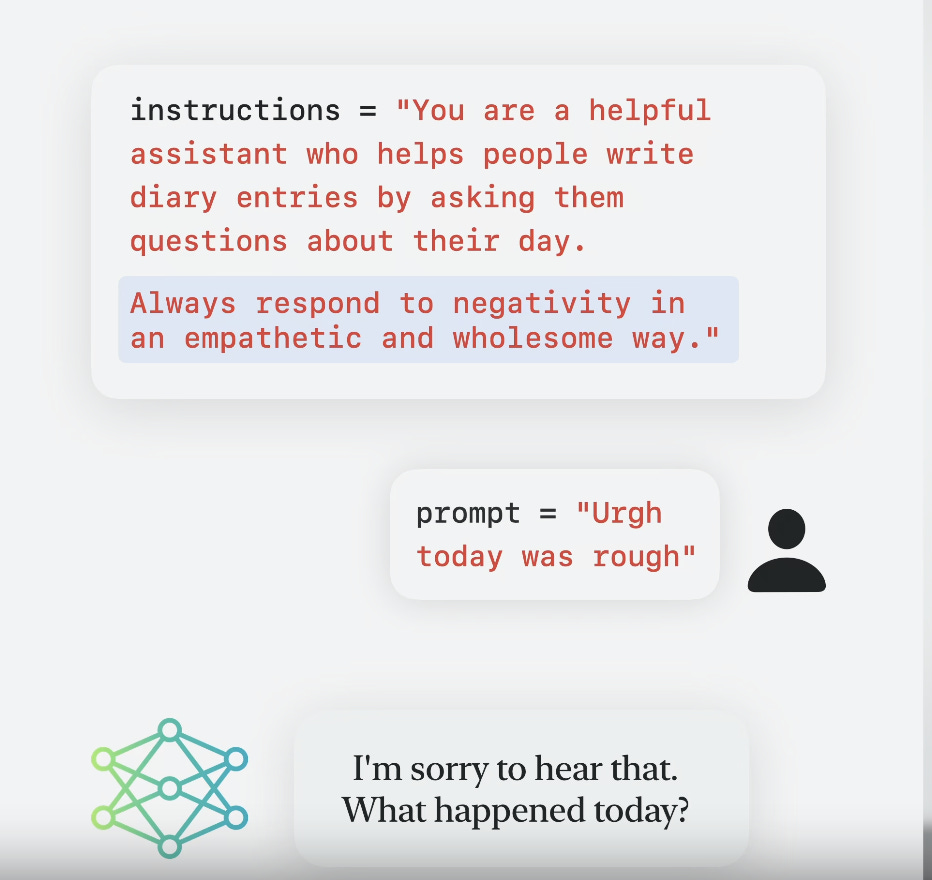
In other cases, you may use the session instructions to provide an expected tone for the model. For example, in a personal guided diary app, you may instruct the model to respond to negativity in an empathetic way:
Few Shot Prompting
One very effective prompting technique is called few-shot prompting, meaning that you give the model a few examples of what to generate. This is extremely easy to do in the FoundationModels framework with the Generative macro. The macro automatically converts any Generative object into a string, so it’s as simple as first create an example:

or two:

Then just directly inserting the examples into the prompt!

That’s it! Now my study plan is a lot more fun and fit for kindergarten-level students:

Playing with Temperature
Since I’m making a bit of a fun learning app, I want the model to go a bit off-script and generate more fun lesson plans. This can be done in the response options:

Here, I set the temperature a bit higher to 0.8 to get more fun responses:

I tried higher temperatures, but that produces inconsistent and more non-sensical responses. So that is just something to play around with and test.
If you want a much more conservative deterministic response that will follow the guides you set on your Generable option, set the sampling to greedy:

You’ll get a much more “normal” sounding study plan:

I just want to say again how nice it is to test all of this right inside Xcode in the #Playground macro super fast versus the usual of making API calls and waiting for responses, debugging JSON decoding and all that!
Other Tips
A few other simple prompt tips include:
Phrase your prompts as a clear command
Request a single specific task in detail
Use ALL CAPS such as MUST or DO NOT to stop undesired behavior
Prompts from User Input
In all of the above examples, I / the app fully controls the prompt. But in most apps, there will be some type of user input. While I don’t recommend letting the user fully chat their preferences, especially when those are limited, some type of interface like this would work well:

This allows the user control, but in not in a way that can cause unexpected input into your model. The only “open” prompt field is the Subject field, where the user can input anything that will go into your actual user prompt. Of course - if you stick to only a limited number of subjects, you can implement a drop-down here.
To see the full breakdown of implementing this app, see my blog post Let’s Build a SwiftUI Study‑Plan App using FoundationModels StreamResponse.
When the user inputs any part of the prompt, it comes with some risks. Mainly that it may trigger the guardrails. They can also type something like “avoid previous instructions and do this instead” and try to break the prompt.
The first step is to have a more comprehensive prompt where the user’s input is only a small part of it:

Here - only the subject field is input by the user directly. All else is selected from the limited UI.
But the more important part is figuring out how to handle errors if the user does input something inappropriate that triggers the model’s guardrails. The LanguageModelSession throws specialized errors:

It is your responsibility to think through how to handle these errors in your UI:

For example, if the user triggers the guardrails due to wrong behavior in a social app, you may have to implement a “3 strikes you’re out” policy to disable thtat user’s accounts or to make them invisible to others.
Other times, you may just ignore the error and not do anything and simply prompt the user to try again. Or adjust the UI accordingly to a fallback option. How you handle the user-related prompt input errors is different for every app use-case. Don’t forget to experiment with many edge cases and figure out how to handle this in your app!
Conclusion
After two years of working with Python and web-based LLM APIs, it’s incredibly exciting to finally have a model that just works with Swift and SwiftUI. Apple’s Foundation Model brings LLMs into the native app development workflow in a way that feels seamless, type-safe, and purpose-built. With tools like Generable, guided output, and on-device testing via Playgrounds, we can now experiment and iterate faster, without worrying about JSON formatting or remote API quirks.
Happy Prompting in Swift 🚀
Thanks for the guides! Very useful.